Job Failover and Failback
This page discusses the process of failing over and failing back live workloads during an actual event. These steps should not be enacted unless actual failure conditions are met.
When a failover condition has been met, failover will be triggered automatically if you disabled the wait for user option during your failover configuration. If the wait for user before failover option is enabled, you will be notified in the console when a failover condition has been met. At that time, you will need to trigger it manually from the console when you are ready.
Files and Folders Replication
Initiating a Files and Folders Job Failover
- On the Jobs page, highlight the job that you want to failover and click
Failover or Cutoverin the toolbar. - Select the type of failover to perform.
- Failover To Live Data - Select this option to initiate a full, live failover using the current data on the target. The target will stand in for the source by assuming the network identity of the failed source. User and application requests destined or the source server or its IP addresses are routed to the target.
- Perform Test Failover - This option will be grayed out as this option is not available for files and folders jobs.
- Failover To A Snapshot - This option will be grayed out as This option is not applicable to files and folders jobs.
- Select how you want to handle the data in the target queue.
- Apply Data In Target Queues Before Failover Or Cutover - All of the data in the target queue will be applied before failover begins. The advantage to this option is that all of the data that the target has received will be applied before failover begins. The disadvantage to this option is depending on the amount of data in queue, the amount of time to apply all of the data could be lengthy.
- Discard Data In The Target Queues And Failover Or Cutover Immediately - All of the data in the target queue will be discarded and failover will begin immediately. The advantage to this option is that failover will occur immediately. The disadvantage is that any data in the target queue will be lost.
- The last option will vary depending on if your source is clustered.
- Leave Source Services Running - If your source is standalone, select this option if you want the services specified in Failover options in the job options to remain online instead of being shutdown. This is for live or snapshot failover. It does not apply to test failover.
- Leave Source Cluster Resources Online - If your source is clustered, select this option if you want the cluster resources to remain online instead of being taken offline. This is for live or snapshot failover. It does not apply to test failover
- When you are ready to begin failover, click Failover.
Once the failure condition has been resolved, you may prepare for failing operations back to the original systems. Before users can access the source again, you will need to restore the data from the target back to the source and perform a failback. Once failback is complete, user and application requests are no longer routed to the target, but back to the source.
Ideally, you want to restore your data from the target back to the source before you fail back. This allows users who are currently accessing their data on the target because of failover to continue accessing their data. Restoration before failback reduces user downtime. Another method, which may be easier in some environments that have strict IP addressing policies, allows you to failback first and then restore the data from the target to the source. A possible disadvantage to this process is that users may experience longer downtime, depending on the amount of data to be restored, because they will be unable to access their data during both the restoration and the failback.
Note
If you want to failback only, without performing a restoration, follow the instructions for failing back then restoring and you will be able to skip the restoration process. Keep in mind that if you skip the restoration process, any data changes that were made on the target during failover will be lost.
Restoring Then Failing Back FIles and Folders Jobs
Restoring before failing back allows your users to continue accessing their data on the failed over target, which is standing in for the source, while you perform the restoration process. The key to this process is to keep the users off of the source, but allow the source and target to communicate to perform the restoration.
- Resolve the problem(s) on the source that caused it to fail. Make sure in resolving the problems, that you do not bring the source on the network at this time because the target currently has the source’s identity because of failover.
- Disable all of the IP addresses on the source that you failed over to the target.
- If you failed over all of your source IP addresses, change an existing IP address on the source to a new, unique IP address that the target can access. If you inserted your source server into the console using a reserved IP address or a public NAT address when you created the job, and you did not failover that IP address, you can skip this step.
- Configure your new, unique IP address that you created or the reserved IP address that you are using so that it does not automatically register with DNS. This option is on the Advanced TCP/IP Settings dialog box on the DNS tab.
- Bring the source onto the network using the IP address that the target can access. You can disregard any identity conflict errors.
- Stop any applications that may be running on the source. Files must be closed on the source so that updated files from the target will overwrite the files on the source.
- If you had to create a new, unique IP address on the source, you will have to remove the original source in the console and add it back in using the new, unique IP address. Use a local account, not a domain account, that is a member of the Double-Take Admin and Administrators groups. Complete this step on the Servers page. If you inserted your source server into the console using a private IP address or a public NAT address when you created the job, you can skip this step.
- On the
Jobs page, highlight the job and clickRestore. -
Confirm
Restore Datais selected, then highlight your source server in the server list. If your server has a public NAT address, you can disable the default communication port and specify another port number to use, allowing the servers to communicate through a router.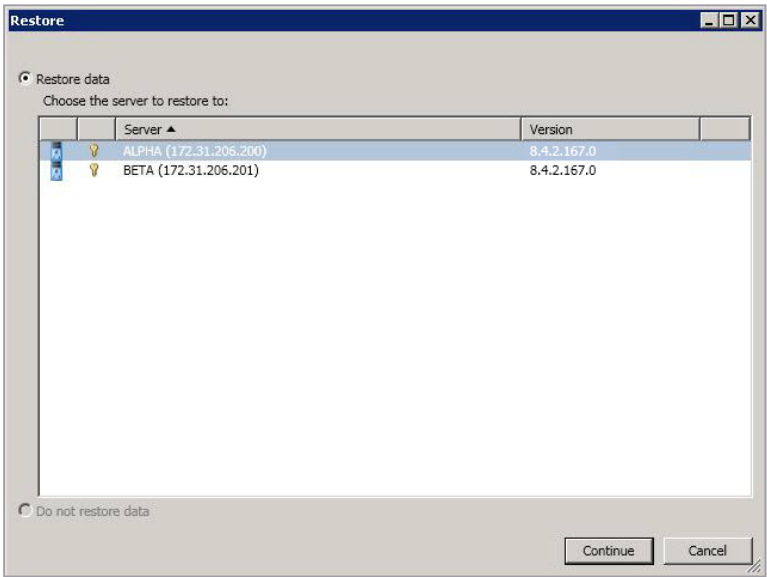
-
Click
Continueto start the restoration. During the restoration, only the data is restored back to the source. Shares are not created on the source during the restoration. Shares that were created on the target during failover will need to be created manually on the source, if they do not already exist. - When the restoration is complete, highlight the job and click
Failback. -
In the dialog box, highlight the job that you want to fail back and click
Failback.Note
If you do not see your job after failback, remove and re-add your target to the console. The job may not be visible depending on where you are running the console from.
-
After failback is complete and the job is stopped, enable or add the IP addresses on the source that you disabled earlier. Make sure that you keep any new addresses that you created because the job is still using that address.
- If you restored to a new source and are going to enable protection again, edit the job to reconfigure your failover settings.
- Click
Startto restart protection.
Failing Back and Then Restoring Files and Folders Jobs
Failback before restoration can be a simpler process, but it may require additional downtime. The amount of downtime will depend on the amount of data to be restored. Users must be kept off of the source and target during this entire process.
- Remove the source from the network and fix the issue that caused your source server to fail. Make sure in resolving the problems that you do not bring the source on the network at this time because the target currently has the source's identity because of failover.
- Schedule a time for the failback and restoration process. Select a time that will have minimal disruption on your users.
- When you are ready to begin the failback process, power on the source, if it is not on already. Make sure you do not connect it to the network. You must prohibit user access to both the source and target.
- On the Jobs page, highlight the job and click
Failback. - Highlight the job that you want to failback and click
Failback. -
Once failback is complete, connect the source to the network. Make sure that end users continue to be prohibited from accessing both the source and target because the updated data from the target needs to be restored back to the source.
Note
Depending on where you are running the console from, you may need to add the target back to the console after failback in order to see your job.
-
Stop any applications that may be running on the source. Files must be closed on the source so that updated files from the target will overwrite the files on the source.
-
On the
Jobspage, highlight the job and clickRestore. -
If you want to skip the restoration, select
Do Not Restore Data, and clickContinue. Keep in mind that if you skip the restoration process, any data changes that were made on the target during failover will be lost. If you want to restore the changed data from the target back to the source, selectRestore Data, highlight your source server in the server list. If your server has a public NAT address, you can disable the default communication port and specify another port number to use, allowing the servers to communicate through a router. - Click
Continueto start the restoration. Note that the information pertaining to Shares in the previous section also applies to this order of operations. - When the restoration job is complete, the job will automatically be stopped. At this point, you can allow users to access the source again.
- If you restored to a new source and are going to enable protection again, edit the job to reconfigure your failover settings.
- Click
Startto restart protection.
Full Server Replication
When a failover condition has been met, failover will be triggered automatically if you disabled the wait for user option during your failover configuration. If the wait for user before failover option is enabled, you will be notified in the console when a failover condition has been met. At that time, you will need to trigger it manually from the console when you are ready.
Important: Original VM State
- If automatic reverse configuration is enabled, the original VM must be online and available in order for Syncsafe to complete the steps to configure it as a target and begin mirroring.
- If automatic reverse configuration is disabled, the original VM must be disconnected from the network and steps must be taken to prepare it to be a target for a Full Server Replication job.
- See Protection Job Options Explained - Reverse Protection and Routing for details on configuring this option.
Important Considerations For Failover and Failback
- If your NICs were configured for network load balancing (NLB), you will have to reconfigure that after failover.
- Right before failover occurs, SyncSafe Replicate will stop all services that are not critical to Windows. If the stop command fails (perhaps because it is a blocking driver that cannot be shutdown, as is the case with some anti-virus software) or a third-party tool restarts any of these services, SyncSafe Replicate may not be able to successfully failover files locked by the services. In this case, you may have to make manual modifications to your server after failover.
- Some applications and Virtual Machine devices create and use software devices within the operating system, but they have the characteristics of a Virtual Machine device. For example, NIC teaming solutions are typically implemented in the operating system, however they are still designed to emulate a single piece of network Virtual Machine. In these cases, the device will not be failed over because it appears to be a Virtual Machine device.
- Windows License Activation will not follow the server upon failover. You will need to use the appropriate slmgr commands to update and apply the appropriate MAK or KMS configuration and keys following the system failover.
- After a failover is complete and your target server is online as your source, when you login, you may have to specify a Windows reboot reason. You can specify any reason and continue. Additionally, you may see a prompt indicating a reboot is required because of a device change. You can disregard this error and select to reboot later.
- Because Windows 64-bit has a strict driver signing policy, if you get a stop code 0x7b after failover, you may have drivers failing to load because the driver signatures are failing the policy. In this case, reboot the server and press F8. Choose the option to not enforce the driver signing policy. If this allows the system to boot, then the problem is being caused by the cat file signature mismatch. If your system still fails to boot, contact technical support.
Initiating a Full Server Failover
To initiate a failover, on the Jobs page, highlight the job that you want to failover and click Failover or Cutover in
the toolbar.
Next, Select the type of failover you wish to perform:
- Failover To Live Data - Select this option to initiate a full, live failover using the current data on the target. The source is automatically shut down if it is still running. Then the target will stand in for the source by rebooting and applying the source identity, including its system state, on the target. After the reboot, the target becomes the source, and the target no longer exists.
- Perform Test Failover - Select this option to perform a test failover.
- The network adapters on the test failover machine must have the same friendly name as the network adapters you have mapped for live failover in the
Network Adapter Optionssection. For example, if you have Local Area Network mapped to Local Area Network, the test failover machine must have an adapter named Local Area Network. If you have Local Area Network mapped to Network 2, and the test failover machine does not have an adapter named Network 2, test failover will fail. - The source, target, and protection job will remain online and uninterrupted during the test.
- During the test, any scheduled snapshots for the protection job will be deferred until after the test server is online.
- The test will be performed using the test failover settings configured during job creation.
- The test failover will take a snapshot of the current data on the target and mirror the data from the snapshot to the test failover machine using the same mirroring options as the protection job.
- Once the mirror is complete, the test failover machine is rebooted automatically to finalize the test failover process.
- The test failover machine will maintain its own identity during the test.
- The test failover machine will maintain its own networking which keeps it isolated from the rest of the network in order to avoid network conflicts and redirecting clients. Applications or functionality that relies on the source networking may not be fully testable with the test machine networking.
- When using the test failover machine, log in with local credentials to avoid trust relationship issues.
- When you are finished with your test, undo it.
- When you undo a test failover, the snapshot will be maintained or deleted as specified in the test failover settings of the protection job.
- At any time during a test failover, you can undo the test, perform a live failover, or failover to a snapshot, including your test failover snapshot. (Performing a live failover or failing over to a snapshot will automatically undo any test in progress.)
- The network adapters on the test failover machine must have the same friendly name as the network adapters you have mapped for live failover in the
- Failover to a snapshot—Select this option to initiate a full, live failover without using the current data on the target. Instead, select a snapshot and the data on the target will be reverted to that snapshot. This option will not be available if there are no snapshots on the target. To help you understand what snapshots are available, the Type indicates the kind of snapshot.
- Scheduled - This snapshot was taken as part of a periodic snapshot.
- Deferred - This snapshot was taken as part of a periodic snapshot, although it did not occur at the specified interval because the job between the source and target was not in a good state.
- Manual - This snapshot was taken manually by a user.
At this stage, you will need to select how you want to handle data in the target queue:
- Apply Data In Target Queues Before Failover Or Cutover - All of the data in the target queue will be applied before failover begins. The advantage to this option is that all of the data that the target has received will be applied before failover begins. The disadvantage to this option is depending on the amount of data in queue, the amount of time to apply all of the data could be lengthy.
- Discard Data In The Target Queues And Failover Or Cutover Immediately - All of the data in the target queue will be discarded and failover will begin immediately. The advantage to this option is that failover will occur immediately. The disadvantage is that any data in the target queue will be lost.
- Revert To Last Good Snapshot If Target Data State Is Bad - If the target data is in a bad state, SyncSafe Replicate will automatically revert to the last good SyncSafe Replicate snapshot before failover begins. If the target data is in a good state, SyncSafe Replicate will not revert the target data. Instead, SyncSafe Replicate will apply the data in the target queue and then failover. The advantage to this option is that good data on the target is guaranteed to be used. The disadvantage is that if the target data state is bad, you will lose any data between the last good snapshot and the failure.
When you are ready to begin the failover, simply click Failover.
Undoing a Test Failover
If you performed a test failover, you can undo it by selecting Undo Failover or Cutover in the toolbar. Confirm the undo process when prompted. If configured, the snapshots used for the test failover will be deleted.
SyncSafe Replicate Licensing Note
If you performed a live failover of a full server job but did not enable reverse protection when you configured the job, you will lose the activated target license. To workaround this situation, uninstall SyncSafe Replicate on the failed over source (currently on the target Virtual Machine) using the SyncSafe Replicate Console or Windows uninstall applet, and the uninstall process will deactivate both the source and target licenses. You can then reinstall SyncSafe Replicate on the failed over source (currently on the target Virtual Machine) and reactivate the source's original license.
Reversing Full Server Jobs
After a full server failover, the source is running on your original target Virtual Machine and your target no longer exists. That means the source and target Virtual Machine now share the same identity, which is the source identity. If you did not enable reverse protection, your source is a domain controller, or if you have to rebuild your source, you will have to reverse your protection manually.
Reversing Full Server Jobs - Automatic Reverse Replication Enabled
- Fix the issue that caused your original source server to fail.
- Connect the original source server to the network.
- Make sure the production NIC on your original source is online. If the NIC is disabled or unplugged, you will experience problems with the reverse. Make sure you continue to access the servers through the reserved IP addresses, but you can disregard any IP address conflicts for the primary NIC. Since the new source (running on the original target Virtual Machine) already has the source's address assigned to it, Windows will automatically assign a different address to the original source.
- On the Jobs page, highlight the job that you want to reverse. If the job is not listed, you may need to add your servers to your console again. Use the reserved IP addresses and local credentials.
- Highlight the job you want to reverse and click Reverse in the toolbar. During the reverse process, you will see various states for the job. During the Restoring process, the target identity is being established on the original source Virtual Machine. During the Synchronizing process, protection is being established from the source (on the original target Virtual Machine) to the target (on the original source Virtual Machine). The reverse protection is also established in the opposite direction. When the reverse process is complete, the target (on the original source Virtual Machine) will reboot. At this point, your source is still running on your original target Virtual Machine with the source name, but the original source Virtual Machine now has the target identity.
- To go back to your original Virtual Machine, highlight the job and click Failover. The source identity will now be applied to the target (on the original source Virtual Machine), and the target identity will again be gone. Both servers will have the source identity.
- To bring back the target identity, highlight the job and click Reverse. The same process as above will be repeated, but on the opposite servers. When the reverse is complete, you will be back to your original identities on the original Virtual Machine.
Reversing Full Server Jobs - Manual Job Reversal
If you did not enable reverse protection, your source is a domain controller, or if you have to rebuild your source, you have two options after a failover. You can continue running from the failed over server indefinitely. This server is your source (running on the original target Virtual Machine) and you can protect it to a new target. Your other option is to go back to the original Virtual Machine. Without reverse protection, you have to complete this process manually, which can be difficult.
Preparation of your original source Virtual Machine or a new server is key to this manual process. The type of preparation required will depend on the role of the original source server, the applications that were used on the original server, whether the original source was a physical or virtual server, and the failure or event that occurred.
The following should be considered when deciding how to proceed with a manual reversal:
- Server role - If your original source was a domain controller, a Cluster Service server, or a Certificate Service server, you will have to reinstall Windows. The utility required to reuse a server cannot be used on these types of servers. Follow the steps starting with step 1A. Preparing a new server by reinstalling Windows below.
- Applications—If your original source was running a name-specific application, like Exchange, you should reinstall Windows. Follow the steps starting with step 1A. Preparing a new server by reinstalling Windows below.
In general, as long as the original Virtual Machine is still healthy and viable, and is not exempted by the two items above, you may choose to either reuse it, or build a new Virtual Machine to replace it with a clean build. Reusing an existing Virtual Machine can reduce the time required to restore data as original data on the Virtual Machine can be reused.
Preparing a new server by reinstalling Windows
- Install or reinstall Windows on virtual server using unique, temporary server information.
- After the operating system installation is complete, install SyncSafe Replicate using the license key from your original target.
- After SyncSafe Replicate is installed and activated, locate the original Replication Job in the Jobs list and delete it. Then, configure a new Full Server replication job to mirror the source server to the new target. You will not be able to create a new protection job as long as the existing job remains as it is linked to the Target machine to which the system failed over.
Reusing your original source Virtual Machine
- Disconnect the original source Virtual Machine from the network. You must make sure the original source is completely disconnected before proceeding.
- After the original source Virtual Machine is disconnected from the network, remove the target server identity from Active Directory. You should remove the target's original identity, not the identity of the source which the original target Virtual Machine now holds.
- Keeping the original source Virtual Machine disconnected from the network, reboot it and login as the local administrator.
- Stop all application services on the original source Virtual Machine and set them to manual.
- If you failed over the source IP address, assign a new unique IP addresses.
- Modify the original source Virtual Machine identity by placing the server into a workgroup/removing it from your Domain. Make sure you reboot when prompted, continuing to keep the server disconnected from the network.
- After the reboot, login as the local administrator.
- Using the SyncSafe Replicate Console, remove and reinsert the original source server into the server list on the
Serverspage. - Double-click on the server in the server list to view the server details page, and then click on the
Edit Server Propertieslink. - Under the Licensing section, enter the license key from the original target server and click Add. If the original source server license key is listed, remove it from the Current license keys list. Click OK to return to the Servers page.
- Run the Microsoft Sysprep utility to modify SIDs (security identifiers) and the server name. If desired, you can use the original target server name when the utility prompts for a server name. See the Microsoft web site for details on the Sysprep utility. If the sysprep utility does not apply a new server name, you will need to manually change the name of the computer in the system properties.
- Connect the server to the network. Return to the SyncSafe Replicate Management Console and locate the original Replication Job in the
Jobslist and delete it. Then, configure a new Full Server replication job to mirror the source server to the new target. You will not be able to create a new protection job as long as the existing job remains as it is linked to the Target machine to which the system failed over.