Console Introduction
SyncSafe Replication by US Signal is powered by the Carbonite OpenText toolset, which provides a number of powerful capabilities that transcend specific virtual environments and their limitations.
To prepare for the implementation and operation of the SyncSafe Replication services, let's take a moment to look at the console and review managing servers and jobs within our environment.
Console View - Servers
Launch the SyncSafe (OpenText) Console and from the icon bar at the top of the window, select Servers. You will be greeted with the following console display:
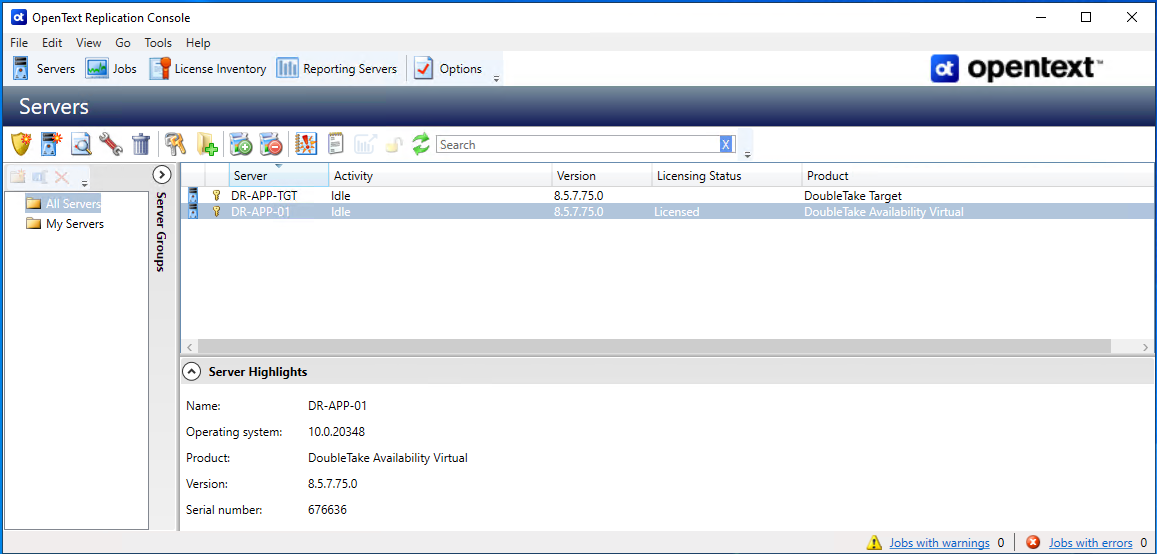
The Servers page is for server management and job creation, and allows you to accomplish the following tasks:
- Add and Remove Servers - You can add servers to and remove servers from the console.
- View and Edit - You can view server details and edit OpenText Availability server properties.
- Create Job - You can create a protection or migration job for a selected server.
- Server organization - You can organize the servers that are in your console into groups, allowing you to filter the servers you are viewing based on your organization.
Console Display Note
If you are running the SyncSafe Console on a registered server that will be protected and not from the recommended independent Management Console system, and if you have uninstalled and reinstalled the console on the system, you may see the server twice on the Servers page because the reinstall assigns a new unique identifier to the server. One of the servers (the original version) will show with the red X icon. You can safely remove that server from the console.
You can also use the Jobs button to access your protection jobs, and License Inventory button to view your available licenses and their status.
The following sections will review the specific areas and controls available to you in the Servers view.
Left Pane
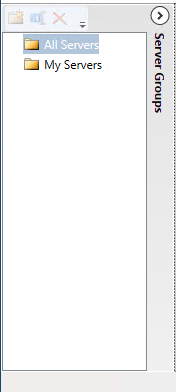
You can expand or collapse the left pane by clicking on the Server Highlights heading. This pane allows you to organize your servers into folders. The servers displayed in the top right pane will change depending on the server group folder selected in the left pane. Every server in your console session is displayed when the All Servers group is selected. If you have created and populated server groups under My Servers, then only the servers in the selected group will be displayed in the right pane.
Between the main toolbar and the left pane is a smaller toolbar. These toolbar options control the server groups in the left pane.
Create new Server Group ![]() - Creates a new server group below the selected group.
- Creates a new server group below the selected group.
Rename Server Group ![]() - Allows you to rename the selected server group.
- Allows you to rename the selected server group.
Delete Server Group ![]() - Deletes the selected server group. This will not delete the servers in the group, only the grouping itself.
- Deletes the selected server group. This will not delete the servers in the group, only the grouping itself.
Top Right Pane
The top pane displays high-level overview information about your servers. You can sort the data within a column in ascending and descending order. You can also move the columns to the left or right of each other to create your desired column order. The list below shows the columns in their default left to right order.
Column 1 (Blank Column Header)
This column displays machines by type:
Source or Target Server ![]() - A standard source or target system.
- A standard source or target system.
Windows Cluster Source or Target ![]() - Source or Target that is a Windows Server Cluster.
- Source or Target that is a Windows Server Cluster.
vCenter Server ![]() - This indicates a vCenter Server.
- This indicates a vCenter Server.
ESX Server ![]() - This indicates an ESX Server.
- This indicates an ESX Server.
Offline Server ![]() - This indicates a source or target server that is offline and/or unreachable by the Console.
- This indicates a source or target server that is offline and/or unreachable by the Console.
Servers in an Error State ![]() - Any server icon with a red circle with a white X overlay is in an error state, which means the console can communicate with the machine, but it cannot communicate with SyncSafe Replication on it.
- Any server icon with a red circle with a white X overlay is in an error state, which means the console can communicate with the machine, but it cannot communicate with SyncSafe Replication on it.
Column 2 (Blank Column Header)
This column indicates the access level.
Processing ![]() - The console is attempting to communicate with the machine.
- The console is attempting to communicate with the machine.
Administrator Access ![]() - The console has authenticated and has been granted full control over this source or target.
- The console has authenticated and has been granted full control over this source or target.
Monitor Only Access ![]() - The console has privileges to monitor the source/target workload only.
- The console has privileges to monitor the source/target workload only.
No Security Access ![]() - The console has no access to the source/target workload.
- The console has no access to the source/target workload.
Column 3 - Server
The Server column displays the name or IP address of the server. If you have specified a reserved IP address, it will be displayed in parenthesis.
Column 4 - Activity
There are many different activity messages that keep you informed of the server activity. Most of the activity messages are informational and do not require any administrator interaction. If you see error messages, check the Server Details for more information. See the Managing Servers page's Viewing Server Details section for more information.
Column 5 - SyncSafe Version
This column displays what, if any, version of SyncSafe's OpenText core is installed.
Column 5 - Licensing Status
The status of the license, if any, on the server. If your license is expired, any jobs using that server will be in an error state. If you have multiple licenses, the status will indicate the license that requires the soonest action. For example, if you have a SyncSafe Replication migration license that expires in two days and a SyncSafe Replication Protection license that must be activated within 10 days, the status will be for the SyncSafe Replication migration license.
Column 6 - Product
The SyncSafe Replication products, if any, licensed for the server.
Bottom Right Pane
The details displayed in the bottom pane provide additional information for the server highlighted in the top pane. You can expand or collapse the bottom pane by clicking on the Server Highlights heading.
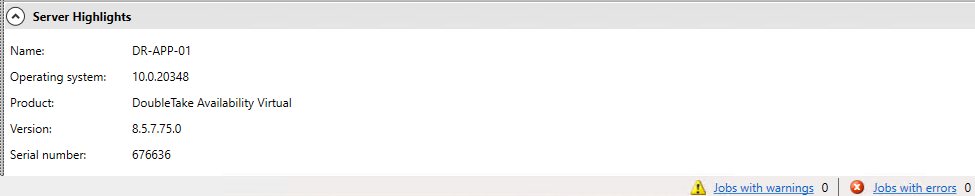
- Name - The Name or IP address of the Server.
- Operating System - The operating system of the server. This field will not be displayed if the console cannot connect to the SyncSafe Replication services on the server.
- Product - The SyncSafe Replication products, if any, that are licensed for the server.
- Version - The SyncSafe Replication product version, if any.
- Serial Number - The serial number associated with the SyncSafe Replication license assigned to the server.
Toolbar
Now that we've reviewed the various parts of the Console when looking at our servers, let's review the Toolbar options available to us.
Create New Job 
Starts the process to create jobs to protect the servers added to your console, with the types of jobs available based on the license applied to the server:
- Protect - This allows the creation of any sort of replication job from source to target.
- Migrate - Used strictly for workload migrations, this allows the creation of migration jobs only.
Add Servers 
Opens the Add Servers wizard and allow you to add servers to the console. This will be discussed in greater detail in Step One of the Configuration Quickstart page.
View Server Details 
This will launch the Server Details page which will provide a greater amount of information about the server. See the Managing Servers page's Viewing Server Details section for more information.
Edit Server Properties 
This allow you to edit the server's properties and options. See the Server Options Explained page for more information.
Remove Server 
Does what it says on the tin, removes the select server from the console. This does not remove the SyncSafe software or associated licenses from the server.
Provide Credentials 
Changes the login credentials that the SyncSafe Replication Console use to authenticate to a server. This button opens the Providing Credentials dialog box where you can specify the new account information. You will remain on the Servers page after updating the server credentials. If your jobs use the same credentials, make sure you also update the credentials for any active jobs on the server. See the Managing Jobs and Snapshots page for more information.
If you are using a full server job with reverse protection enabled, you need to update the target image stored on the source if you change the credentials on the target server. See the Viewing Full Server Job Details section of the Managing Jobs page for more information.
Known Issue: Domain Credentials Changes
If you are using domain credentials for your SyncSafe Replication servers and you change those credentials, you will continue to receive a Windows Security pop-up in the SyncSafe Replication Console, even if you enter correctly updated credentials in the pop-up. This is an unavoidable Windows WCF communication limitation, and you must update the credentials for the SyncSafe Replication servers using Provide Credentials in order to terminate the repeated pop-ups.
Manage Group Assignments 
Allows you to assign, move, and remove the selected server from specific server groups. This buttons opens the Manage Group Assignments dialog box where you can assign and unassign the server to specific server groups. The server will appear in server groups marked with a checkmark, and will not appear in groups without a checkmark. Servers assigned to a server group will automatically appear in parent server groups.
Install 
Installs or upgrades the SyncSafe Replication software on the selected server. This button opens the Install page where you can specify insallation options.
Uninstall 
Uninstalls the SyncSafe Replication software from the selected server. This does not remove the server from the console, allowing you to install the software again as needed. You will need to use the Remove Server button following an uninstall to completely remove the selected server from the console.
View Server Events 
Views Windows application event messages for a server. This button leaves the Servers page and opens the View Server Events page. The Troubleshooting page's Windows Event Messages section provides a complete list of Windows Event Messages.
Launch Reporting 
Launches the legacy Reporting Service report viewer (deprecated).
Activate Online 
Activates licenses and applies the activation keys to servers in one step. You must have Internet access for this process. You will not be able to activate a license that has already been activated.
Refresh 
Does what it says on the tin. This will refresh the list of servers.
Search
The search field allows you to search by server name or specific type of SyncSafe Replication (Availability/Mirroring or Migrate) in the list and display matching items.
Right-Click Menu
The Right-Click menu provides access to the same features as the toolbar relative to the server that you have selected. Options that are not applicable based on what you have selected will be grayed out.
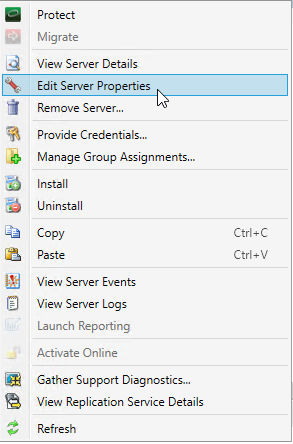
Notable Unique Options
- Copy - Copies the information for the selected servers. You can then paste the server information as needed. Each server is pasted on a new line, with the server information being comma-separated.
- Paste - Pastes a new-line separated list of servers into the console. Your copied list of servers must be entered on individual lines with only server names or IP addresses on each line.
- Gather Support Diagnostics - Executes the diagnostic DTInfo utility which collects configuration data for use when reporting problems to technical support. It gathers SyncSafe Replication log files; SyncSafe Replication and system settings; network configuration information such as IP, WINS, and DNS addresses; and other data which may be necessary for technical support to troubleshoot issues. You will be prompted for a location to save the resulting file which is created with the information gathered. Because this utility is gathering several pieces of information, across the network to your console machine, it may take several minutes to complete the information gathering and sending the resulting file to the console machine.
- View Replication Service Details - Views the replication service details for a server. This button opens the Replication service view window. This separate window allows you to continue working in the OpenText Replication Console while monitoring the replication service details. You can open multiple Replication service view windows for multiple servers. When the OpenText Replication Console is closed, all Replication service view windows will automatically close. If you do not want to open separate windows, you can switch between servers that are in your OpenText Replication Console from within the Replication service view window.
Next Steps
Now that you have familiarized yourself with the console's basic layout, you may proceed with the basic setup and configuration of servers and jobs, covered on the Configuration Quickstart and Protection Plan Quickstart pages.
You will also notice that the Jobs and License Inventory sections have their own unique interfaces within the console application. These are covered under the Managing Jobs and Snapshots and Licensing pages respectively.